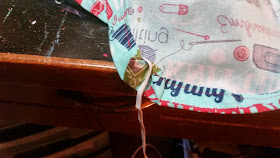
My ironing board is cheap. I think I got it at Target years ago and I got the bottom of the barrel for just $10. I should probably go out and buy a more sturdy one, but I'm not ready to spend $30 on something that still technically works. However, I can do something about the nasty, drab cover!
I was so excited to do this project that I completely forgot to take a picture of the ironing board with the old cover on it. I just ripped that puppy off! Good riddance!! As you can see from the above picture it was a dreary light blue color and it had seen better days. Once while using Wonder Under....basically you iron it on your fabric and then it turns your fabric into an iron on patch of sorts....I didn't pay attention to the fact that the pieces of Wonder Under I was using was larger than the fabric I was ironing it onto. Hence the darker outline of said fabric...oops. I also did the classic leave your iron laying down for too long and burn your cover mistake! My biggest complaint about it though was the fact that the cover barely fit over the ironing board. It drove me bonkers!
So while I was perusing the aisles of the fabric store I stumbled across the cutest fabric and just had to buy it. I'm telling you I hope there is a fabric store in heaven....a girl can dream right!
I used my ironing board as the template for my new cover and cut the excess fabric off leaving a 4 inches border around the board.
I had elastic to use for the cover, but then I noticed that the old cover had this cord that was used to tighten it to the board. I figured I might as well see if I could reuse it so I ripped it out. I love reusing!
Next up was ironing down a hem so I could slip the elastic or cord through. I didn't really think of this step prior to taking my old cover off so it was a bit interesting ironing with the old cover just kind of hanging out on top and not being anchored to the board. Lots of pinning and sewing.
In the end I decided to use the elastic instead of the cord. I liked the idea that I could really pull it tight so no more slipping off.
After what seemed like forever and my hand screaming from pulling on the safety pin with the elastic connected to it it was finally through. I put the cover on the board and pulled it tight. Now normally when you do a hem you pull the elastic tight and then stitch it together and then sew closed the hem. Since the elastic is on the underside of the board I figured it didn't matter so I just pulled it tight and tied it into a knot and cut the excess elastic off.
And here it is!!! I absolutely LOVE it! The fabric is perfect....all sorts of crafts. Perfect for my craft corner!
So much better than the plain, dreary one! I love how much difference it made in just a short time.


No comments:
Post a Comment