One of our goals this year was to improve the lighting in our kitchen. It was like a tomb! I was used to it, but this last winter especially in the evening when it was time to make dinner I just hated being in there. We hadn't really talked about when we were going to update the lights, but then by pure chance....aka stalling at Costco since I promised a certain 3 year old we would eat lunch there, but then finished shopping at 10:30 in the morning and thought I should wander the aisles a bit! Wow that was a long sentence! I just happened to come across these awesome puck lights that could be mounted to the underside of the cabinets. The best part was there were 6 of them, they came with18...yes 18 batteries you'd need and they were on sale for $15.99! I figured I would buy them and see what Michael thought...worse thing was I'd be taking them back to Costco.

A couple nights later Michael put them up in our kitchen and I fell in love! With both the lights and my husband all over again! Seriously it made such a HUGE difference in my kitchen. See we have two IKEA lights that I bought 10 years ago when we moved in. The light over the kitchen sink just finally stopped working....okay it didn't really stop working the light bulbs stopped working sometimes less than a week after we'd change them. So I just stopped replacing the bulbs since that was a waste of money. The main light in the kitchen had those directional lights that were fun, but not when you are trying to prepare dinner and your body is actually blocking the light from shinning on the counter top! Ugh!!! Now I have all these nice LED lights that make my counter top light up so nicely! I actually ended up going back and buying another 6 pack of lights since one corner was still a bit dim and since these are LED and the light under my microwave is not it looked funny. So we just mounted....they come with heavy duty stickers...two under the microwave. I also stuck one under Zeke's bed so Owen has a light he can use if he needs to as well.

The absolute best thing about the lights is they come with a remote! The remote can control up to 36 lights at one time! That must be one huge kitchen! At first I thought it would be silly to have a remote, but it is so much easier to push a button and have all 9 lights come on at once instead of pushing them each individually. Of course I could just push one and turn it on if I only needed to use one at that moment! The other thing I love about the remote is we can control the percentage of light. They have preset buttons at 10%, 40%, 80% and 100%. We have ours set at 80% because they are plenty bright enough. The last thing about the remote is the timer feature. I use it every time I turn the lights on! These suckers take 3 AAA batteries each and I do not want to turn them on and forget and they've been left on for hours and hours while I didn't even need them to be. According to the packaging if they are used at 100% without turning them off the battery life is expected to be around 20 hours. Most of the time I only use them in the morning during breakfast/lunch packing time. I usually set the time for 30 minutes and then again during dinner prep and never for more than 60 minutes.
After seeing what a difference those lights made we really started thinking about getting a new main light for the kitchen. I went on to Amazon and found a nice inexpensive LED light that people raved about. I ordered it and Michael installed it and we HATED it! It was awful....so awful I didn't even take a picture of it. It basically made our kitchen look like there was an alien abduction in progress! Horrible! So back to Amazon that went thank you very much! We were just going to go to Lowe's and buy some light fixture that would be sufficient until we remodel the kitchen in 4-5 years. That's when I got to thinking that that was a horrible idea. Why buy a light fixture knowing that in 4-5 years you are going to be done with it. I texted Michael my concerns and asked him to consider thinking about can lights. It's what we knew we were going to upgrade to when we remodeled it was just a matter of figuring it out since when we remodel we are going to be removing a wall and we didn't want to have to put the can lights in one location now and then end up having to move them later after we remove the wall. Decisions decisions! Being a homeowner is tough sometimes....first world problems I know!
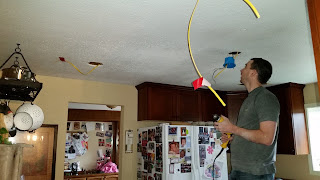
Michael and I did some research together online prior to me leaving for my Bi-Annual Girls Weekend. I still wasn't sure if he was totally on board or not and figured I wouldn't bring it up for a while. To my surprise when I got back home on Valentine's night he already had the whole project mapped out on the ceiling in regards to where the can lights should go. I was so surprised! At first he had the kitchen mapped for 6 can lights, but with further research we went down to 4 instead. The next day Michael was off work....love county jobs...he gets every holiday off! We took all 4 kids with us and headed to Lowe's to pick up all the stuff he'd need. Almost $300 later and we were ready to go. I told Michael it was funny spending so much since we could have just gotten one fixture and spent under $100! This really was an investment though since Michael had to buy the proper tools he needed to do the job.. Also those tools will get used again when we do the remodel and he had lots of leftover electrical cord so he won't have to buy that the next time either.

I wasn't figuring that he'd get right to work that very same day, but he did! First cutting out the holes for the can lights. We decided to just take down the broken light over the sink and then we put a white cap on it.
After cutting out the 4 holes he started threading the wire though. This was the tough part because he had to drill through the floor joists to get the wire to go through. That was one of the big expenses for this project....it's a really long flexible drill bit. It's amazing and Michael even commented on how he had no idea how someone would try to do this job without one. You definitely need the right tools for the job!
He tied all the wires into the junction box that was where the original light was and then he capped that off as well. When we do the remodel he will go ahead and fix the drywall for the two old fixtures then. Right now the caps look great.
First can light all wired up and ready to go in the hole!
Fast forward a few hours....it only took him 6 hours start to finish...not bad really...says the lady that didn't really do anything besides hold a flashlight for about 5 minutes.
Ta Da! I have light in my kitchen!!! It's amazing the difference it makes! I love being in my kitchen now! Also Michael repainted the ceiling so it's so nice and bright white!
I actually texted the above picture to my mom and asked.....notice anything? She didn't know we were doing anything and she hated how dark my kitchen was! She texted back with....LIGHTS!!! Yeah...they look great!!!!
I'm so thoroughly pleased with how they turned out and so grateful to my hardworking hubby to spend almost his entire day off....working!
And since he is such a total pro at can lights now I went and bought a smaller one....note to self smaller does not in the can light world mean cheaper...to install outside of Ella's closet. Ella's closet is in this little nook in her room and it was so hard to see her clothes it was ridiculous! At first Michael wanted to install a separate switch, but I figured it would be fine and less work for him to just connect it to her main light switch. I think it turned out great and it's so nice for her to be able to see the clothes she's picking out for herself!


