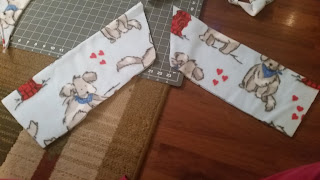
This year the boys 'wear' Christmas present are bathrobes. I found Jack's at a garage sale for $1! It was in great condition. Owen's I bought on Black Friday for $10....it was normally $40! As for Zeke's I really wanted to make his. I had pinned this tutorial on how to make one a while ago and I also had bought this cute doggie fleece in hopes of making a blanket, but I never got around to it. I figured it would be the cutest fabric for a bathrobe.
The kids spent the night at Ga-Ga & Pa's on December 20th so I was able to finish it. He's my little shadow all day long and usually at night I'm so exhausted I have no desire or energy to sew! I had actually done all the cutting out the previous week after the kids went to bed so I just did all the sewing on the 20th. This is probably the latest I've ever waited to finish a Christmas present!
In order to cut out the fabric to the correct size I needed one of Zeke's sweaters. I just cut around it leaving at least 2 inches all the way around. Of course I cut it straight down the sides and not across the bottom of the sweater.
Then I folded that back piece in half and trimmed it so the arm holes would be the same.
Then you use that folded in half back piece to cut out the two front panels. I had to cut out both a left and right one. You trim the front middle piece because that's where the robe will come together in the front.
I used the sleeves of the sweater to cut out two sleeves for the robe. I made sure to fold over the fleece so the fabric is only open on one side.
Instead of just using the doggie fabric I thought it would be fun to use an accent fabric for the trim and the rope to tie the robe shut. These pieces are the loops that will get sewed to the robe so the rope can go through them.
First thing in regards to the sewing was to pin the front and back pieces together with the loops pinned in there as well. I did have to make sure not to keep going and sew all the way up and sew the arm holes shut!
In order to figure out where the loops should go I got an outfit of his and put them wear the top of his pants were. I also trimmed off some of the bottom of the robe since it was too long.
After sewing up the robe I had to sew the open side of the sleeves shut and then shove them into the holes on the robe and sew those on. That was tricky since the sleeves are pretty small.
After that I was able to flip the robe right side out and pin on the trim. By this time I was seriously amazed at how awesome it looked. Fleece really truly is so forgiving!
I stitched the trim on and then sewed the rope and threaded it through the loops. From start to finish it took 3 hours....1 hour of cutting and 2 hours of sewing. It wasn't really that hard at all. My hands were pretty tired just because fleece is ornery and wants to keep moving all over the place so I really want to wrangle it into place and keep a tight hold on it so it wouldn't get out of place. I'm so pleased with how it turned out and I hope he likes it. I like it so much I think I might make one for myself!
If you're interested in checking out the tutorial I used click here!


1 comments:
SOOOO CUTE!!!
Post a Comment