Monday, December 29, 2014

Dad's Car Pillows!

This year I have been trying to sew as many Christmas gifts as possible. Well do you know that there really isn't that many things you can sew for guys! 

Thankfully I came across this super cute car fabric on Black Wednesday at Joann's. 


My Dad's office is swimming in cars so I thought these would be a nice addition to the chairs he got a while back. 


I had a cute little man observing while I sewed. 


At first I planned to just have the car material as the front and then red as back.


Then I sewed them and it was a bit busy so change of plans! 


I figured added the red as a border in the front would help soften the busyness of the cars. 


I pinned the cars in place and sewed them down. I was really nervous the fabric would shift and be crooked, but thankfully all went well. 


Two pillows....


ready to be stuffed! 


Nice and fluffy! 

Now I just needed to stitch up the hole where I stuffed them and I'd be done. 


This was the part I was dreading. I've sewed up things before after stuffing them and let me tell you...it wasn't pretty. I really wanted to make this professional looking so what did I do....YouTube! Yep...I watched and YouTube video and now I know how to do a ladder stitch and the seam looks great! 


All done! 

Sunday, December 28, 2014

Casserole Carrier!

For my friend Christina I really wanted to try and see if I could make her a nice casserole carrier for Christmas. 


I had to buy Insul-Bright which I had never done before. I saw this fabric and just fell in love with it. 


First thing was to cut 4 pieces of fabric and then 2 pieces of Insul-Bright. I pinned them right sides together with the Insul-Bright on top and then stitched around leaving a 3 inch section so I could turn it right side out. I also switched out my foot on my sewing machine to the clear one so it would move easier.


After stitching I cut off the excess fabric and snipped the corners. 


I made sure to leave the excess fabric where the 3 inch open was so it would be easier to hand stitch it closed. 


Here they are turned right side out. I then hand stitched the openings. 


This is when I had to do some marking on the fabric so I would know where to sew the straps and where to stop sewing. 


The straps were just more fabric pinned right side together and stitched only on the long sides. 


This is where the markings came into play so I could figure out where to pin and place all the pieces. 


Here are the straps stitched on. I have then pinned on the top to the carrier they aren't actually sewn on that far. 


Next were the handles for the straps....more fabric and some warm and natural to make it a little cushioned. I fit the ends of the straps into the handles and then sewed them on. 


Blurry picture, but there it is! 


This step was to stitch on this little pieces of fabric with velcro on the top of the carrier so you can attach a spoon or spatula.


Then I sewed on the huge strips of Velcro to hold everything together. 


And since I had extra fabric I went ahead and made her two pot holders. It was definitely a challenging project which is actually wonderful. It's no fun to have a hobby and never challenge yourself. I found this tutorial on Pinterest....click here if you'd like to take a look! 

Saturday, December 27, 2014

What's Black & White & Red All Over....Kitchen Aid Cover!

As I'm writing this it is August 25th and yes I was already working on Christmas presents in August!! 

I'm so happy with the way this turned out...I even shocked myself! 


A couple days before I wrote this post my mom had mentioned that she wanted a cover for her Kitchen Aid mixer. She even mentioned it would be a nice Christmas present. Enter Pinterest and then Joann Fabrics and I was off on a new adventure. I was trying to find some pattern that had grapes, apples and pears, but they didn't have one. All the patterns with grapes had wine bottles on them and I didn't think that would work so I found this cool old coffee pattern. I thought the burst of red made it fun! 


The first thing I did was cut the main body into 4 pieces. 2 - 7" x 8" and 2 - 17" x 12". If you use a fabric that doesn't have a pattern that's directional then you could just cut one big piece that's 17" x 23". 


I had to cut the big piece into two pieces so I could sew it together so both size would look right. 


See...now both sides will have the coffee signs the right way! 


After that you take one of the smaller pieces and place the long side of the smaller and larger sizes together with the right sides touching. Then pin around like the picture above shows. Take the other small pieces and pin it to the other side of the big piece. It's really hard to explain. Also I don't know about you, but when I read patterns they rarely make sense. I'm usually thinking it's going to be SO difficult, but then once you start doing it and you actually have the pieces of fabric in your hands it makes sense. 


Then I used the rest of the body fabric and cut them into 4 stripes that were 3" wide. Then you sew the ends of this fabric together right sides touching. You'll end up making a loop. You only want the loop to be 54" long so after you sew all 4 into a line measure until you get to 54" and then trim it and then sew the ends together to make a loop.


After making a look you'll have to press the fabric so the wrong sizes are touching...it should look like the picture above. Go ahead and set this aside for later. 


Now take that lovely accents color and cut it into 4 different pieces...2 - 4" x 7" & 2 - 4" x 17" pieces. 


Now sew one of the smaller pieces onto one of the larger pieces right sides face each other. Then sew the other small piece to the other end of the long one. After that sew the other long piece to the ends of the two short pieces. Now you have another loop. 


Take your main body pieces and sew the accent fabric onto the end with the right sides faces. 


The directions called for me to sew it like normal and then go back and do a zigzag stitch on the very edge. It's supposed to give it a bit more strength I guess. After that press the seam up towards the top of the cover. 


Then do a top stitch around on the right side securing the seam.


Now for that smaller loop we made earlier....do a zigzag stitch all around the edge to secure the fabric. The instructions that I followed showed me how to do a ruffle for the bottom, but my ruffle did not work out at all. 


So instead I just measured ever 4" and then pinned the fabric over making it look pleated. This worked out perfectly! 


Pin the pleated pieces to the bottom of the accent pieces and stitch it on. 


Press the seam towards the top of the cover and then do a normal top stitch around the outside like we did earlier after attaching the accent color. 


I know these instructions are about as clear as mud so if you'd like to make one yourself you can click here for the pattern I used. I think it turned out SO cute and I'm sure it looks great on my mom's Kitchen Aid Mixer! In all it took me about 2 hours, but of course that was spread out over half a day due to kids. The thought of actually sitting and finishing a sewing project start to finish sounds like a miracle, but I did finish this the same day I started it so that counts for something! 

Thursday, December 25, 2014

1st Annual Jingle Mingle!

Last Friday we hosted the 1st annual Jingle Mingle! I've always wanted to have a Christmas Party of some sort at our house, but I just haven't felt like I could accomplish it before this year. My friend Alisha helped me with planning and prep so that helped too! I asked each couple to bring both an appetizer and a dessert. We were supposed to originally have 10 people, but we ended up only have 6 people, but it was great fun. I'm hoping next year more will be able to come, but I completely understand....this time of the year is super crazy and 'tis the season to get sick! 


Here was our spread. I made mini caprese salads, stuffed mushrooms, marshmallow cream cheese dip for fruit and cute brownie Santa hats. Alisha & Rich brought the sugar cookies and cream cheese with pepper jelly and crackers and pepperoni and cheese. Nick and Jenn brought the brie cheese with jalapeno sauce and crackers and those cute mini pies.


Rich brought some beer for the guys to enjoy, but I also made a yummy cranberry lemonade punch. So good!


I found this recipe on Pinterest...it's brownies on bottom and then topped with this marzcapone cheese mixture and then a strawberry and a little dab of more cheese mixture. It's a sweet mixture....at first I was little weirded out that it had cheese, but these were so delicious....I ate three! 


And these are the cute mini caprese salads. They were so easy and so yummy and so cute! So much so I made them the very next week for Michael's work Christmas party. 


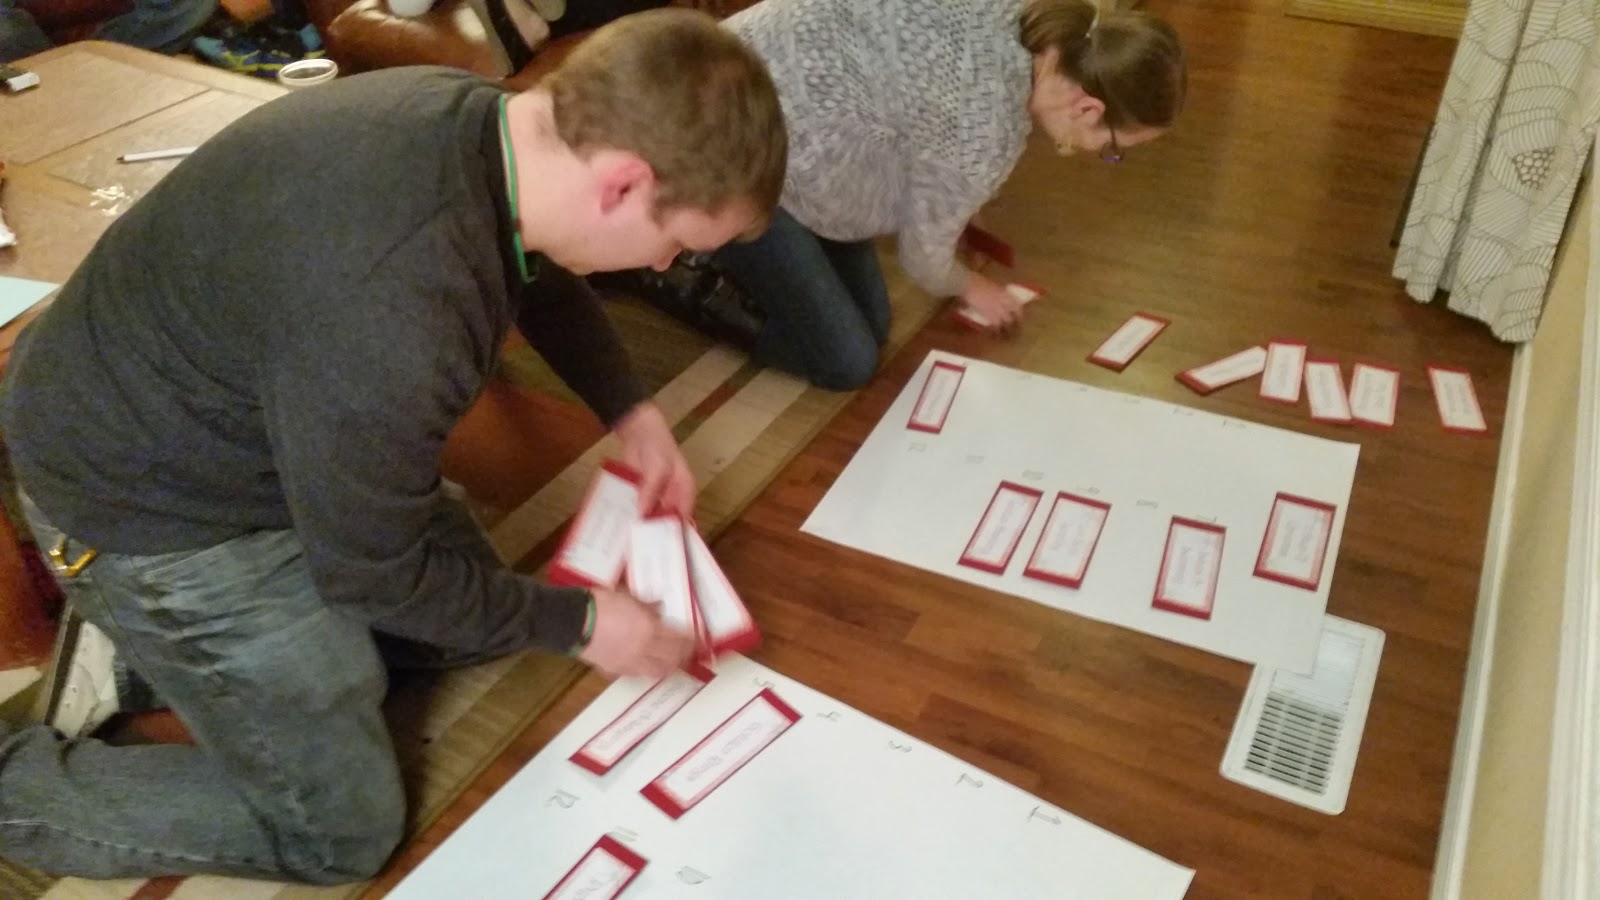
After eating and chatting it was game time. I had found all these Minute To Win It games on Pinterest that were Christmas themed. Alisha and I got together earlier in the week to get all the signs for the games and the game cards cut and looking nice. 


The first game was the 12 Days of Christmas....the object was to put all the days in the correct order in 1 minute. I had planned that these would be hung on the window so we could stand to play the game. I thought the papers could be moved from the side to the board, but the glue dots proved to make that not a possibly. Michael and Rich had troubles!


The next time around we just put them on the floor and did it that way. Jen, Nick and I all kind of had an advantage with this one since we are all in the choir and this is one of the songs we sang. The only thing that did make it tough is that we only sing every other one. So Nick knew half of them and then Jen and I knew the other half that he didn't. Nick did end up winning this one though! 


The 12 Days of Christmas! 


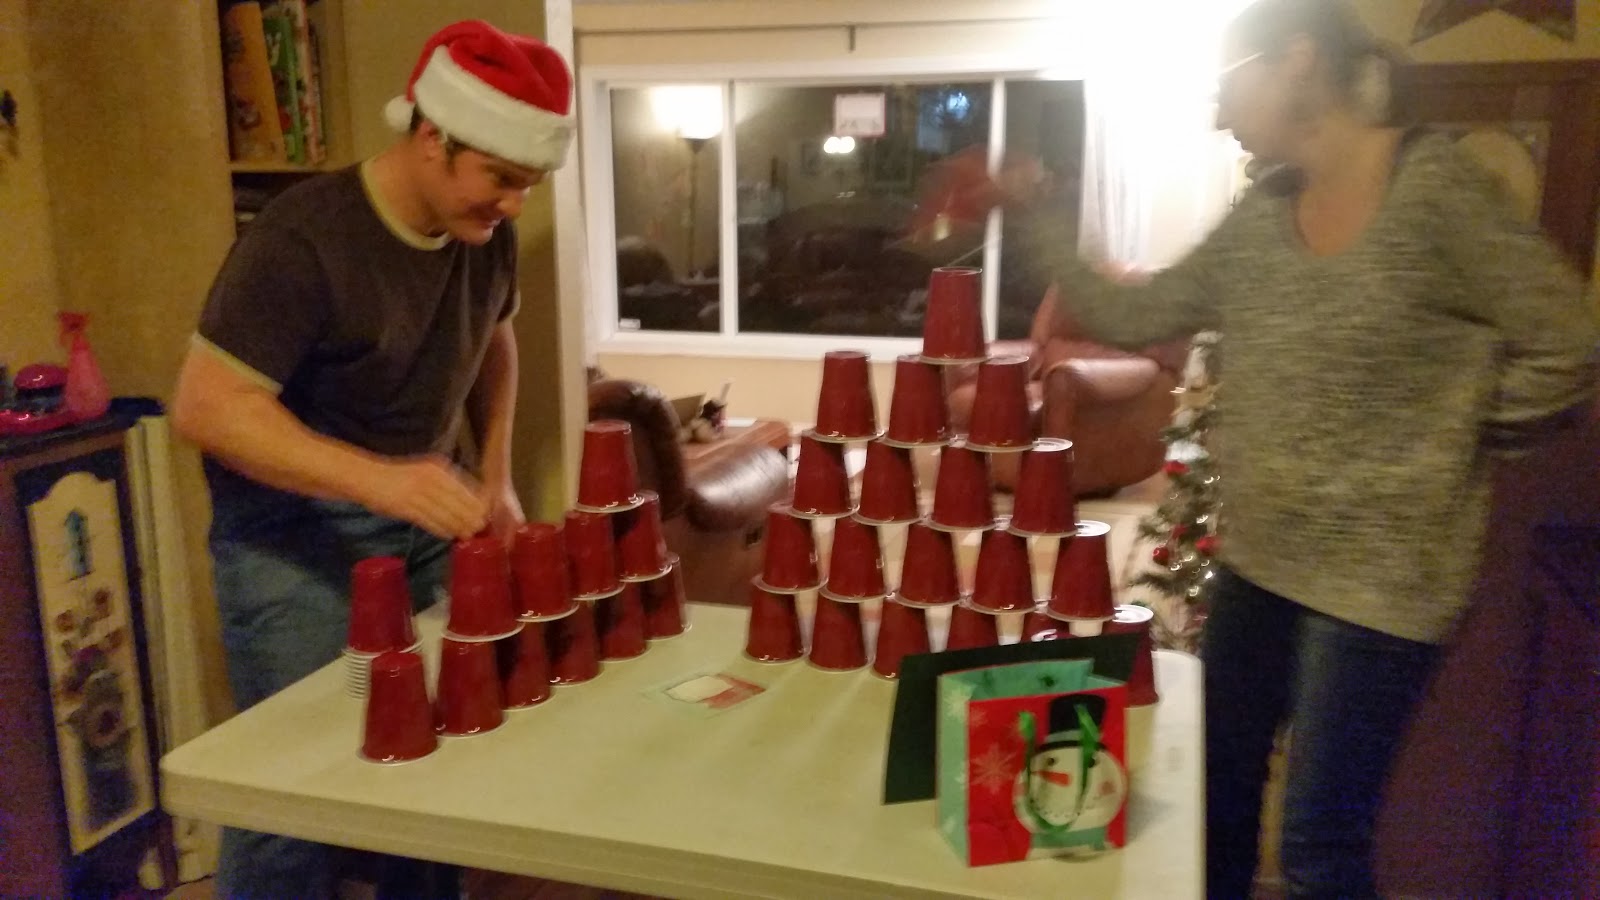
Next was Oh Christmas Tree....the object was to stack the cups into the shape of a tree and unstack them in 1 minute using only one hand!


It was fun watching different strategies emerge. The first two round the person with the cups on the right won so they thought that there was something going that made those cups easier. 
  

When it was my turn I used the other cups and won though so that wasn't the case! So fun! 


Next up was Merry Fishmas! This was my favorite game. You have a peppermint fishing pole made out of a chopstick with a candy cane tied to the chopstick with a string. The object was to catch 4 other candy canes by holding your peppermint pole in your teeth and of course with no hands. 


It wasn't as bad as it sounds and it was tons of fun! 


The fourth game was Snow Shovel. The object was to get as many mini marshmallows into your cup as you can using only chopsticks! 


Michael is so inept at chopsticks it was hilarious. Nick and him both tried numerous different way and they weren't very successful! 


This is there I'm gonna try and squeeze as many as I can between the two chopsticks strategy. 


Alisha's strategy was my favorite she came out and started stabbing them. It was so hilarious! It really worked...in the beginning and then her chopsticks got so sticky she was having a hard time getting them to drop into her cup. So many laughs were had....great fun! 


The last game was The Christmas Nutstacker. The object was to use a candy cane to stack 7 nuts one right on top of the other. This was by far the most challenging one. 


Jen ended up rocking this one and she got 5 to stack without falling. The one above toppled over once she let go. Jen was the overall winner for the ladies and Rich was the overall winner for the guys. 


Of course I had to go buy prizes....I wrapped them and let them pick which one they wanted. Jen got the Sock Monkey cup. The ears are the handles! So cute.....I heard later that she got a fox cup a few days after that so Nick has now claimed the monkey cup as his own! 


Rich got the Ugly Christmas Sweater Cookie Kit....so funny! 

After that we talked more and then ventured into the dining room to play a few games. It was 9:30 at that time and it didn't seem like that much time had past and I look at the clock and it's 12:08! Poor Rich had to be up at 5am that same day to go to work and Nick, Jen and I had to be up early for choir practice the next day! Oh well it was so worth it! We had so much fun with our friends and they enjoyed themselves too. Can't wait to do this again next year!